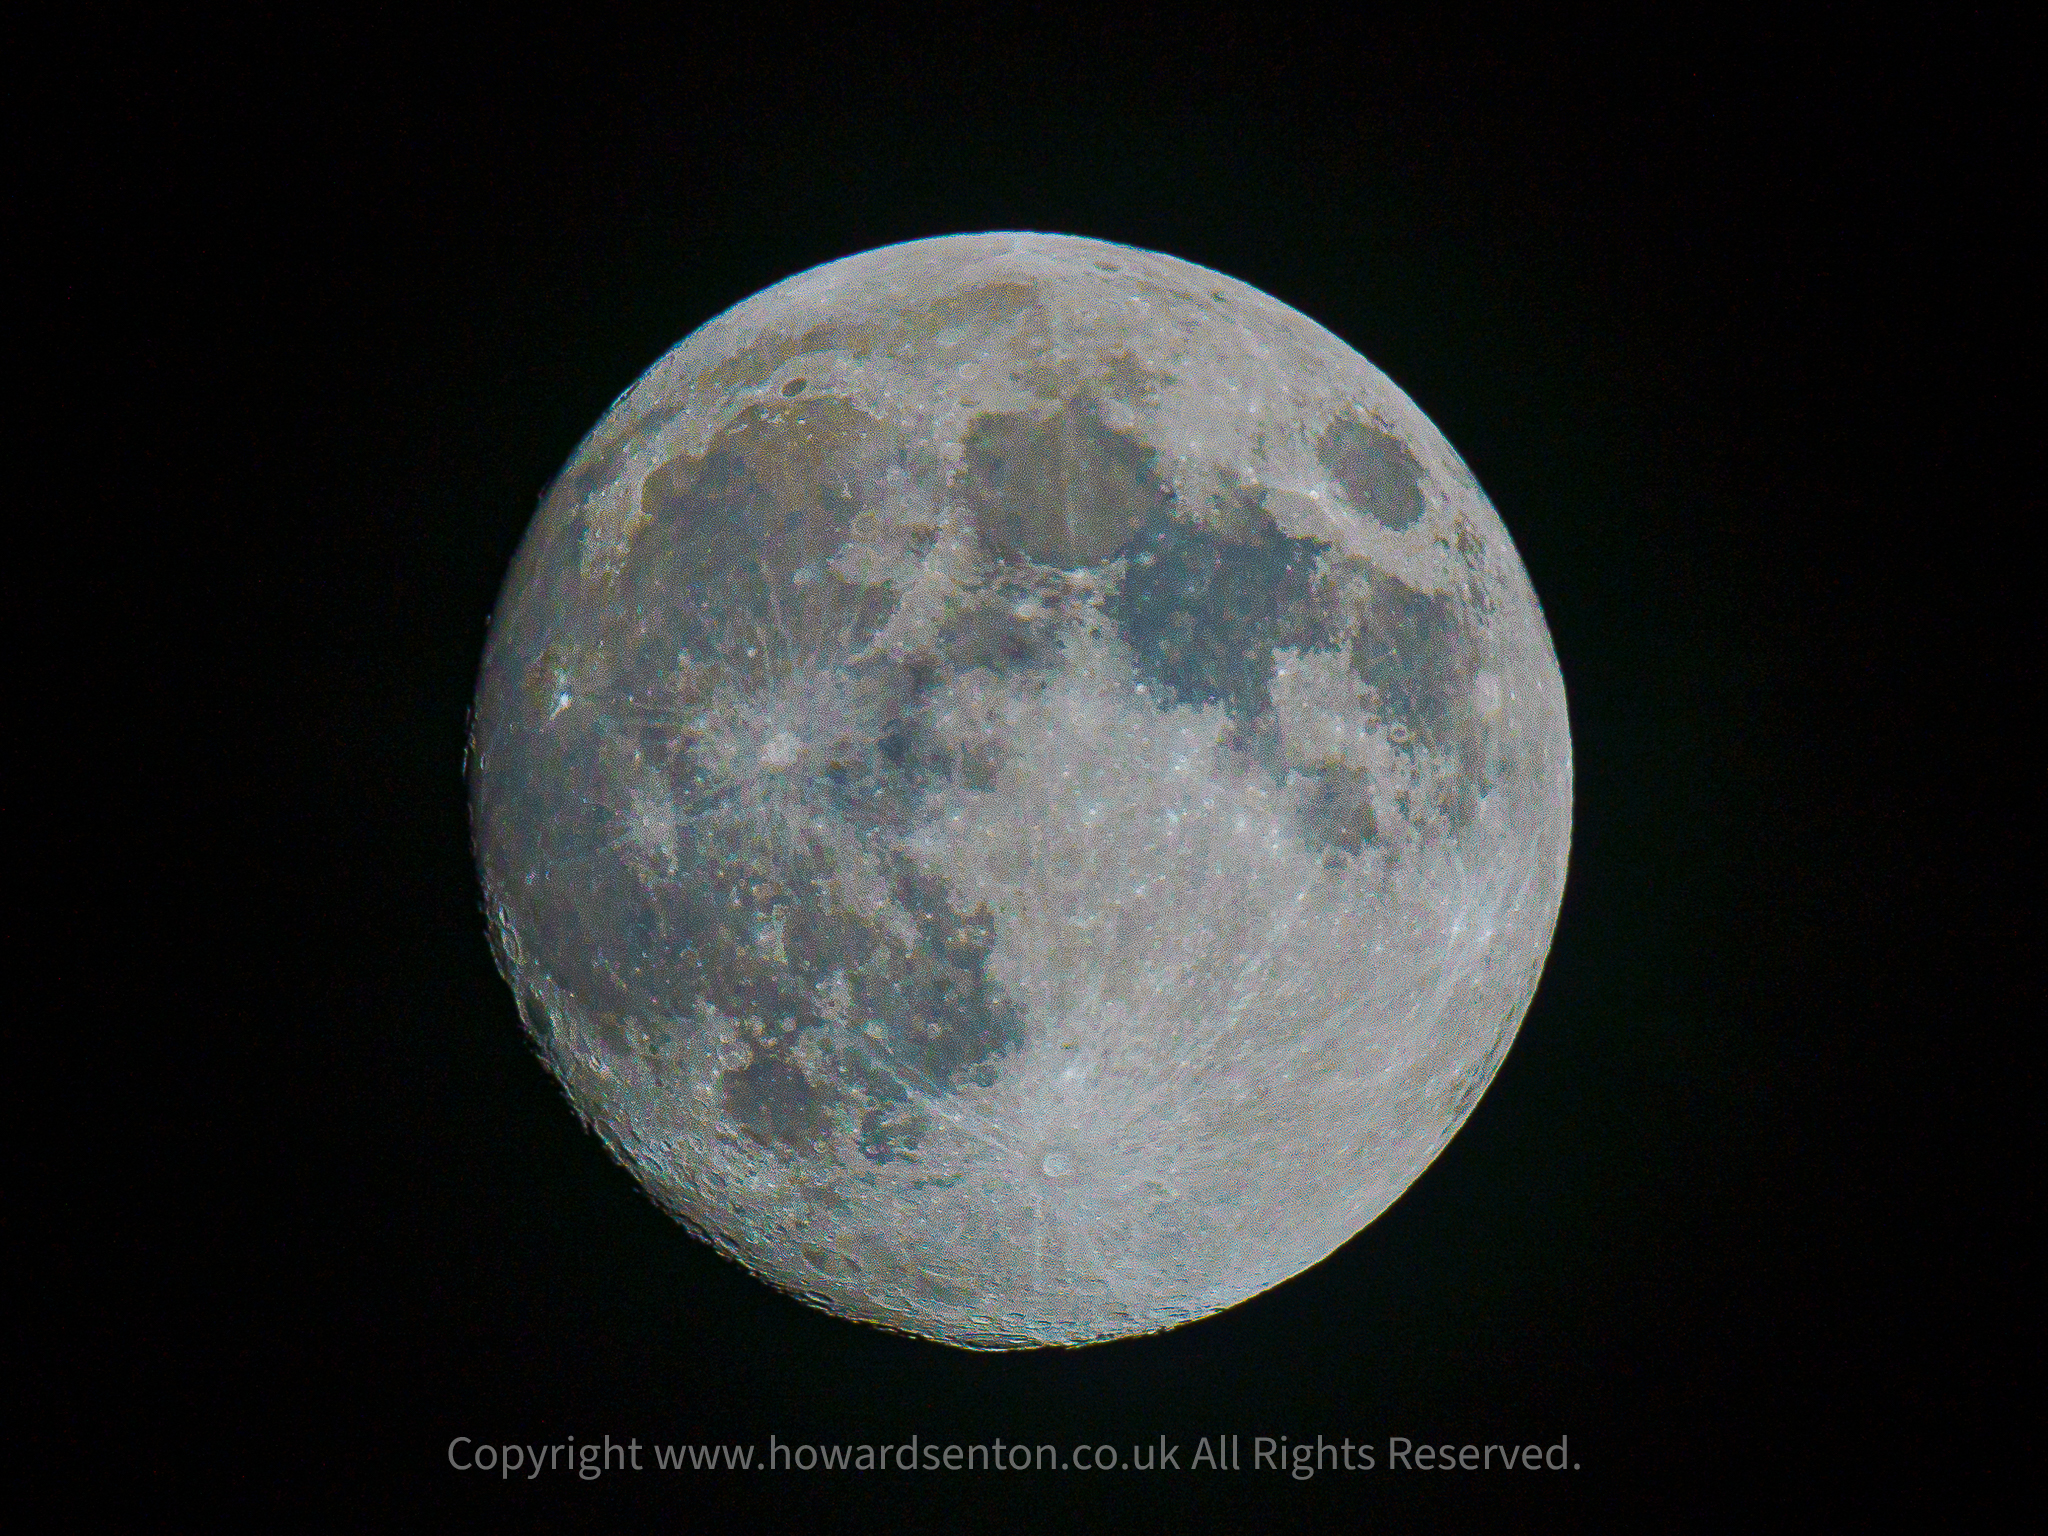
How to Capture the Moon: A Beginner’s Guide to Moon Photography
The Moon is one of the easiest subjects to photograph because it is always there — but getting a sharp, detailed photograph of it can be surprisingly challenging.
With the right settings, a steady camera and a little planning, you can capture everything from a simple full Moon to detailed photographs showing the craters and texture across the lunar surface.
This guide covers how to photograph the Moon using a camera or phone, with advice that works particularly well for beginners.
Why Is Photographing the Moon So Difficult?
The Moon looks bright to our eyes because it is illuminated by the Sun. Your camera sees it very differently.
The biggest mistake beginners make is treating the Moon like a night-time subject and using very long exposures or high ISO settings.
The Moon is actually quite bright.
If you use a typical night-photography exposure, the Moon can become a completely white circle with no visible detail.
The key is to expose for the Moon itself.
What Equipment Do You Need?
You don’t need expensive equipment to start photographing the Moon.
Camera
Almost any interchangeable-lens camera can produce good results, including:
- Sony
- Canon
- Nikon
- Fujifilm
- Panasonic
- OM System
A camera with a crop sensor can actually be useful because it gives your lens more effective reach.
Lens
The longer the focal length, the larger the Moon will appear in your photograph.
For example:
200mm: Good starting point
300mm: Better detail
400mm: Excellent for close Moon photographs
600mm: Excellent for detailed lunar photography
A lens such as a Sony 200-600mm is particularly useful because it gives you plenty of reach.
You don’t necessarily need a huge lens, though. Even a 200mm lens can produce a good photograph that you can crop afterwards.
Can You Photograph the Moon With a Phone?
Yes.
Modern smartphones can produce surprisingly good Moon photographs, particularly phones with a dedicated telephoto camera and computational photography.
The problem is that the Moon is very small in the sky, so the phone needs to use its optical or computational zoom.
Phone tips
- Clean the camera lens.
- Use the telephoto camera if your phone has one.
- Avoid excessive digital zoom.
- Tap on the Moon to focus.
- Reduce the exposure if the Moon looks completely white.
- Keep the phone extremely steady.
- Use a tripod or support if possible.
- Use a timer so you don’t shake the phone when pressing the shutter.
Don’t expect the same level of detail as a long telephoto camera lens, but you can still produce a great photograph.
The Best Camera Settings for the Moon
There isn’t one perfect setting because the Moon’s brightness changes depending on its phase, atmospheric conditions and your equipment.
However, these are excellent starting points.
Beginner starting settings
Mode: Manual
ISO: 100
Aperture: f/8
Shutter speed: Around 1/125–1/500 sec
Focus: Manual
White balance: Daylight or Auto
File type: RAW
Start at:
ISO 100
f/8
1/250 sec
Then check the photograph.
If the Moon is too bright, use a faster shutter speed.
If it is too dark, use a slower shutter speed.
Why ISO 100?
Keep your ISO as low as possible.
The Moon is bright enough that you normally don’t need a high ISO.
Using ISO 100 gives you:
- Less noise
- Better colour
- More detail
- Greater editing flexibility
- Better results when cropping
There is little reason to use ISO 1600 or ISO 3200 for a straightforward Moon photograph.
Why Use a Faster Shutter Speed?
The Moon is moving across the sky because of the Earth’s rotation.
It may look stationary to you, but your camera can record slight movement, particularly when using a very long lens.
A shutter speed such as:
1/250 sec
is a good starting point.
With a long lens, you may even want to try:
1/500 sec
or faster.
Aperture Settings
You don’t necessarily want to photograph the Moon with your lens wide open.
Although your lens may be capable of f/2.8 or f/4, stopping down can help improve sharpness.
Try:
f/5.6 – f/8
as a starting range.
For some lenses, f/8 can produce excellent results.
However, don’t assume f/8 is always best. Take several photographs at different apertures and compare them.
Turn Autofocus Off
Autofocus can sometimes struggle with the Moon, particularly against a dark sky.
Instead, switch to manual focus.
Use your camera’s:
Focus magnification
or
Focus peaking
if available.
Magnify the Moon on the camera screen and carefully adjust the focus until the edges and surface details look as sharp as possible.
Don’t Focus on the Sky
The sky itself doesn’t give the camera anything useful to focus on.
Instead, focus directly on the Moon.
Look for a sharp edge around the lunar surface.
If you’re photographing a crescent Moon, the contrast between the bright and dark areas can also provide a useful focusing point.
Use a Tripod
A tripod isn’t absolutely essential, particularly when using a fast shutter speed, but it can make your life much easier.
A tripod helps when:
- Using a long lens
- Carefully composing the photograph
- Using a lower shutter speed
- Taking multiple exposures
- Photographing the Moon with foreground objects
If you use a tripod, don’t forget to turn off lens stabilisation if your camera/lens combination recommends doing so for tripod use.
Modern Sony lenses can behave differently, so check the instructions for your particular lens.
Use a Remote Shutter or Timer
Even pressing the shutter button can introduce movement.
You can avoid this by using:
- A remote shutter
- Your camera’s smartphone app
- A 2-second timer
- A 5-second timer
For simple Moon photographs, a 2-second timer is usually enough.
Shoot RAW
If your camera supports RAW, use it.
RAW files contain much more information than JPEG files and give you greater control when editing.
This is particularly useful for bringing out subtle detail in:
- Craters
- Lunar mountains
- Shadows
- Surface texture
- Colour variations
Photographing the Full Moon
The full Moon is probably the first thing most people want to photograph.
However, a full Moon can actually be one of the more difficult phases if your goal is to show texture.
Why?
Because sunlight hits the Moon almost directly from our perspective.
This reduces the appearance of shadows across the surface.
The result can look like a bright flat disc.
Photograph the Moon During Other Phases
Some of the most interesting Moon photographs are taken when the Moon isn’t full.
Try photographing:
- Crescent Moon
- First quarter
- Gibbous Moon
- Last quarter
- Thin crescent
The Moon’s surface can look much more three-dimensional when the Sun is illuminating it from an angle.
The shadows around the craters become much more obvious.
The Terminator
One of the best areas to photograph is called the terminator.
The terminator is the boundary between the illuminated and dark parts of the Moon.
This area can contain incredible detail.
Because sunlight is coming across the lunar surface at a low angle, craters and mountains cast long shadows.
If you want dramatic lunar photographs, try photographing around the terminator rather than only photographing the full Moon.
Photographing the Moon With a Foreground
You don’t always have to photograph the Moon on its own.
Try including something in the foreground.
For example:
- Trees
- Buildings
- Church towers
- Bridges
- Wind turbines
- Hills
- People
- Surfboards
- Piers
- Lighthouses
This can turn a technically good Moon photograph into a much more interesting photograph.
The Moon and the Landscape
One of my favourite approaches is photographing the Moon as part of the landscape rather than filling the entire frame with it.
For example, imagine:
A large Moon rising behind a Yorkshire coastline.
The Moon becomes part of the story rather than simply being the subject.
This is where planning becomes particularly important.
How to Photograph a Moonrise
Moonrise photographs can be spectacular.
Before heading out, check:
- Moonrise time
- Moon phase
- Moon position
- Weather
- Cloud cover
- Your location
- The direction the Moon will rise
- Potential foreground subjects
Arrive early.
You don’t want to arrive five minutes before moonrise and discover that you need to walk another half-mile to get the composition you want.
Use a Moon-Planning App
Planning can make a huge difference.
Apps such as PhotoPills can help you work out where the Moon will appear in relation to your chosen location.
This is particularly useful if you want the Moon positioned behind:
- A building
- Lighthouse
- Mountain
- Person
- Tree
- Landmark
The more specific your composition, the more important planning becomes.
Photographing a Supermoon
A “supermoon” occurs when a full Moon coincides closely with the Moon’s closest approach to Earth in its orbit.
The Moon can appear slightly larger and brighter than an average full Moon.
However, don’t expect it to suddenly look dramatically larger.
The difference is relatively subtle.
The real advantage of a supermoon can be the opportunity to combine it with an interesting foreground.
Don’t Use a Very Long Exposure
This is one of the biggest beginner mistakes.
You might think:
“It’s dark, so I need a long exposure.”
But the Moon is illuminated by direct sunlight.
A long exposure can completely destroy the lunar detail.
If your Moon looks like this:
⚪
rather than showing craters and texture, your exposure is probably too bright.
Reduce your exposure.
Check Your Histogram
Your camera histogram can help you judge exposure.
Don’t rely entirely on the camera screen because the brightness of the screen can be misleading.
Look at the histogram and make sure you’re not completely clipping the highlights in the Moon.
You want to retain detail in the brightest parts.
Take Lots of Photographs
Digital photography makes experimentation easy.
Try a series such as:
1/125 sec
1/250 sec
1/500 sec
1/1000 sec
Keep the ISO and aperture the same.
Then compare the results.
You may discover that the faster shutter speeds produce much more detail.
Photograph the Moon Through Clouds
Don’t automatically pack your camera away when clouds appear.
Thin clouds can produce beautiful Moon photographs.
The Moon can appear:
- Soft
- Glowing
- Atmospheric
- Surrounded by a halo
However, if you want maximum lunar detail, clear skies are usually preferable.
What About Moon Halos?
Sometimes you will see a ring around the Moon.
This is often caused by ice crystals in high-level clouds.
These photographs can look fantastic.
Rather than trying to eliminate the clouds, use them as part of the composition.
Editing Your Moon Photographs
Once you’ve captured the photograph, Lightroom or another RAW editor can help bring out additional detail.
Start gently.
Try adjusting:
Exposure: Reduce if necessary
Highlights: Reduce to recover bright areas
Contrast: Increase slightly
Texture: Increase slightly
Clarity: Increase carefully
Sharpening: Apply moderately
Blacks: Adjust to create contrast
Be careful with clarity and sharpening.
Too much can make the Moon look unnatural.
Crop Your Photograph
Your Moon may occupy only a small part of the original photograph.
Don’t be afraid to crop.
Modern cameras have plenty of resolution, particularly cameras such as the Sony A6400 or A6700.
However, there is a limit.
If you crop too heavily, you will eventually start losing detail and the image may become soft.
This is why a longer lens is so useful.
Can You Photograph the Moon in Colour?
Absolutely.
The Moon isn’t always pure grey.
Subtle colour variations can exist across its surface.
When processing a RAW file, try increasing saturation very slightly.
You may reveal subtle:
- Yellow
- Brown
- Blue
- Red
tones.
Don’t overdo it, though.
A heavily saturated Moon can quickly look unnatural.
Photographing the Moon With a Sony Camera
If you’re using a Sony mirrorless camera, the process is straightforward.
For a starting setup, try:
Mode: Manual
ISO: 100
Aperture: f/8
Shutter: 1/250 sec
Focus: Manual
File: RAW
Drive: Single or low-speed continuous
Stabilisation: As appropriate for tripod/handheld use
Then magnify the Moon on the screen and carefully focus.
Take a photograph and check the result.
Adjust shutter speed before changing ISO.
A Good Sony 200-600mm Starting Point
If you’re using a Sony 200-600mm lens, start around:
600mm
ISO 100
f/8
1/500 sec
This should give you a useful starting point for a detailed Moon photograph.
If the Moon is too bright:
Increase shutter speed.
If it is too dark:
Reduce shutter speed.
If you’re handholding, image stabilisation can be extremely useful.
Photographing the Moon With a 55-210mm Lens
You can also get good results using a smaller telephoto lens.
With a 55-210mm lens, try:
210mm
ISO 100
f/8
1/250 sec
The Moon will appear smaller than with the 200-600mm, but you can use cropping to improve the composition.
This can also be an advantage if you’re trying to photograph the Moon alongside a landscape.
Common Moon Photography Mistakes
1. Overexposing the Moon
The Moon becomes a featureless white circle.
Solution: Use a faster shutter speed.
2. Using a high ISO
This introduces unnecessary noise.
Solution: Start at ISO 100.
3. Using autofocus
The camera may struggle to lock onto the Moon.
Solution: Try manual focus.
4. Using a very slow shutter
The Moon can become blurred.
Solution: Try 1/250 sec or faster.
5. Shooting only the full Moon
You miss some of the most interesting shadows and textures.
Solution: Photograph different lunar phases.
6. Cropping too heavily
The Moon becomes soft and pixelated.
Solution: Use a longer focal length.
7. Forgetting to clean the lens
Dust, fingerprints and moisture can reduce contrast.
Solution: Clean the front element before shooting.
Moon Photography Challenge
Why not give yourself a challenge?
Try photographing the Moon during several different phases.
Challenge 1
Photograph a full Moon.
Challenge 2
Photograph a crescent Moon.
Challenge 3
Photograph the first quarter.
Challenge 4
Photograph the Moon rising above a landmark.
Challenge 5
Photograph the Moon above the sea.
Challenge 6
Photograph the Moon through clouds.
Challenge 7
Capture a detailed close-up showing lunar craters.
Challenge 8
Create a landscape photograph where the Moon is part of the composition.
Final Tips for Better Moon Photographs
Remember these simple rules:
Keep ISO low.
Use a reasonably fast shutter speed.
Don’t automatically use your widest aperture.
Focus carefully.
Use a tripod when practical.
Shoot RAW.
Check your histogram.
Take several exposures.
Try different Moon phases.
Plan your Moonrise photographs.
And most importantly, don’t be afraid to experiment.
The Moon is an excellent subject for learning manual exposure because you can photograph the same subject repeatedly and immediately see how changing your settings affects the result.
With a long lens, careful focusing and the right exposure, you can capture surprisingly detailed photographs of the lunar surface without needing a professional astronomical telescope.
Quick Moon Photography Cheat Sheet
| Setting | Starting Point |
|---|---|
| Shooting mode | Manual |
| ISO | 100 |
| Aperture | f/5.6–f/8 |
| Shutter speed | 1/125–1/500 sec |
| Focus | Manual |
| File type | RAW |
| White balance | Daylight/Auto |
| Tripod | Recommended |
| Timer | 2 seconds |
| Lens | 200mm+ recommended |
| Best detail | Around the terminator |
| Best tip | Expose for the Moon |
The most important thing to remember
The Moon is bright — even when the sky around it is dark.
Start with ISO 100, f/8 and around 1/250 sec, take a test photograph, check the Moon’s detail and adjust your shutter speed from there.
Once you’ve mastered the exposure, start looking for interesting compositions rather than simply photographing a white circle in a black sky.
No responses yet