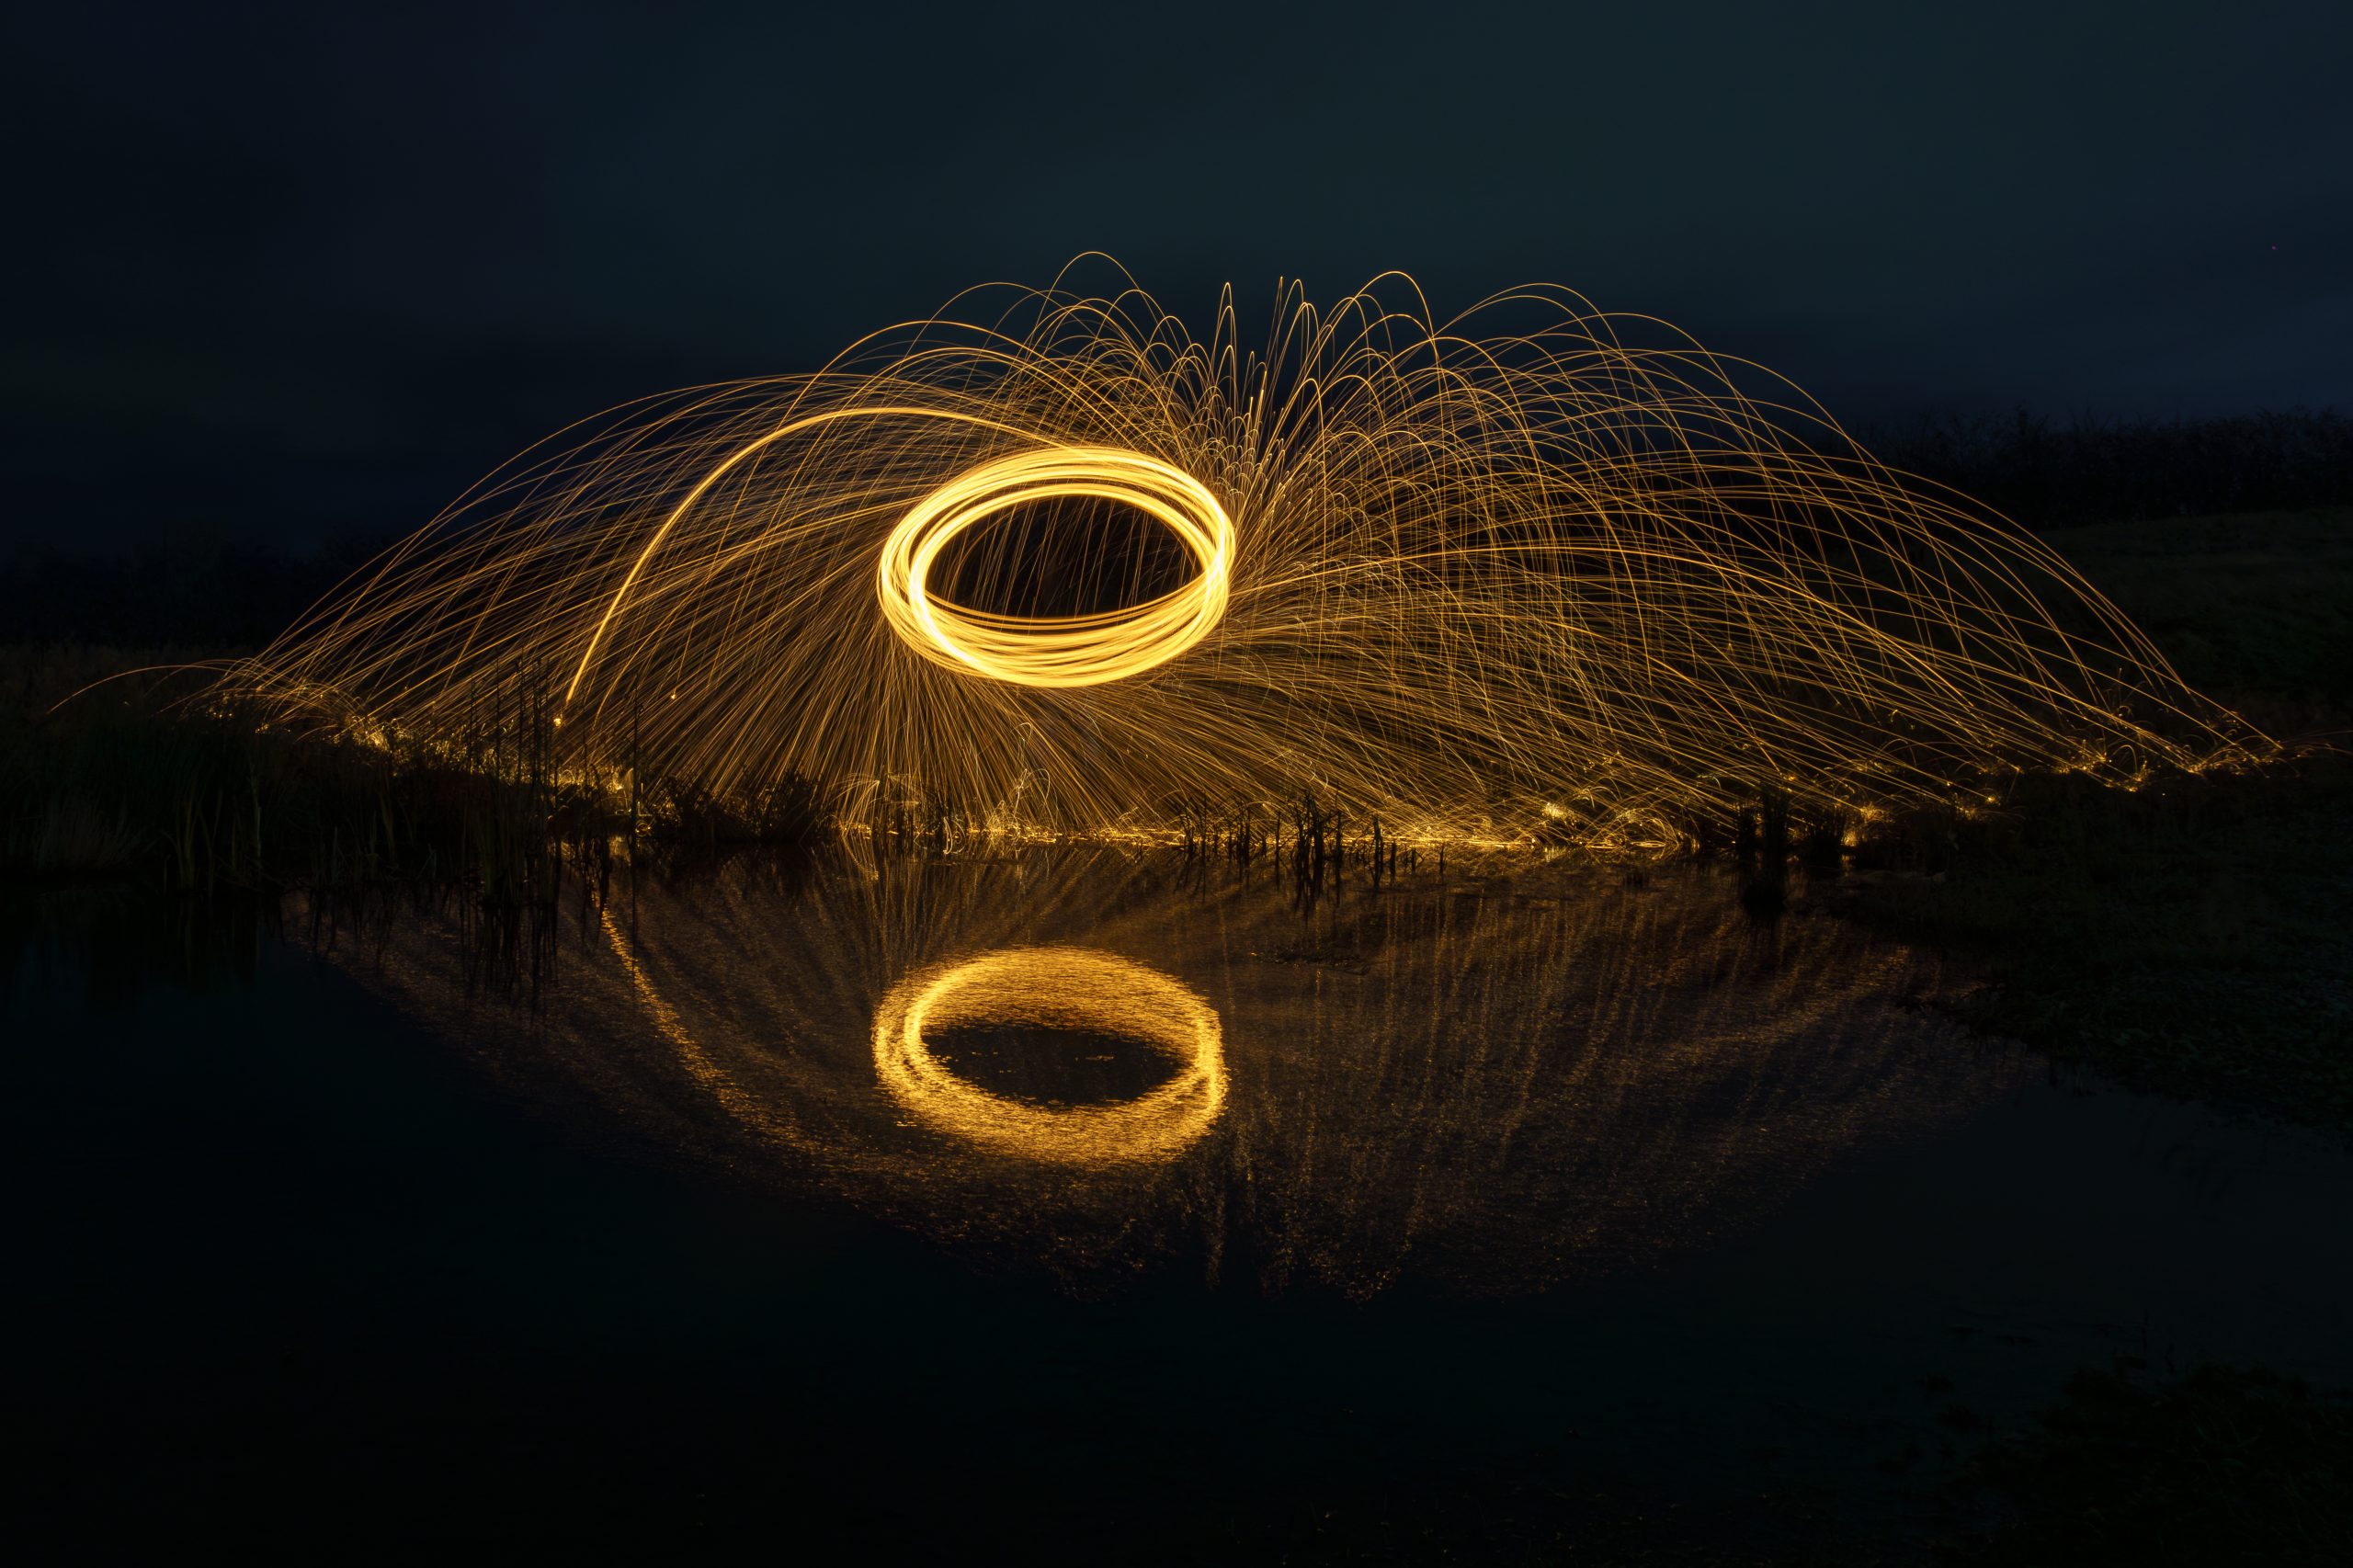
Wire wool spinning is one of those photography techniques that looks much more complicated than it actually is. With a few inexpensive bits of equipment, you can create amazing photographs of glowing orange sparks flying through the air and forming circles of light around you.
It is also a technique where safety is extremely important. You are deliberately creating burning sparks, so you need to choose the location and conditions carefully.
What is Wire Wool Spinning?
Wire wool spinning involves putting fine-grade wire wool inside a metal whisk, attaching the whisk to a cord or chain and spinning it around your body.
When the wire wool is ignited, the rapidly spinning whisk throws glowing pieces of burning steel wool outward. In a long-exposure photograph, these sparks appear as bright trails of light.
The result can look something like a giant circle of fire.
7
⚠️ Safety First
Before getting into the camera settings, this is the most important part of the guide.
Wire wool spinning involves burning material and flying sparks. It can easily start a fire, particularly during dry weather.
Never do it:
- Near dry grass or vegetation
- Near woodland
- Near buildings
- Near parked cars
- Near fuel or flammable materials
- During very dry conditions
- During strong winds
- Where there are people nearby
- Where burning material could land on someone or something
I would recommend using a safe, open, non-flammable area, preferably a hard surface such as concrete.
Check local rules and restrictions before doing it. Some locations may prohibit fires or activities involving burning materials.
Have water available
Always have something suitable for putting out any stray sparks.
A bucket of water is a simple option, but make sure you can quickly reach it.
Never assume that because the wire wool looks like it has gone out that it is completely safe.
What You Need
You don’t need loads of expensive photography equipment.
Basic equipment
- Camera
- Wide-angle lens
- Tripod
- Remote shutter release or camera timer
- Metal whisk
- Fine wire wool
- Strong cord or chain
- Lighter or ignition source
- Torch/headlamp
- Water for safety
For my Sony cameras, I’d normally use a wide-angle lens because you need enough room in the frame for the complete circle of sparks.
A kit lens such as the Sony 16-50mm can work really well.
Choosing the Wire Wool
The grade of wire wool makes a big difference.
You want very fine wire wool because it catches and burns more easily.
Look for something around:
Grade 0000
Avoid materials containing coatings, oils or other substances that aren’t intended for this type of use.
Don’t use steel wool from an unknown source if you aren’t sure what it contains.
Setting Up the Whisk
The wire wool goes inside a metal whisk.
The whisk needs to have openings large enough for the sparks to escape.
Attach the whisk securely to a length of cord or chain.
You need enough length to allow the whisk to travel in a circle without hitting you.
Important
Make sure everything is securely attached before lighting anything.
Give the setup a test without lighting it first.
Stand well away from anything that could be damaged and check that the whisk moves freely.
Camera Setup
This is where the fun begins.
Put your camera on a tripod and compose your photograph before starting the wire wool.
You don’t want to be trying to change camera settings while you’re standing next to burning sparks.
My starting settings
I’d start somewhere around:
| Setting | Starting point |
|---|---|
| Mode | Manual |
| Shutter | 5–15 seconds |
| Aperture | f/8 |
| ISO | 100–400 |
| Focus | Manual |
| White Balance | Around 3,500–4,500K |
| Lens | Wide angle |
| File type | RAW |
These aren’t fixed settings. You’ll probably need to adjust them depending on how dark the location is.
Focus Before You Start
Don’t rely on autofocus.
In the dark, your camera may struggle to find focus.
Instead:
- Put your subject where you want them.
- Use autofocus while there is still enough light.
- Get the focus correct.
- Switch the lens to manual focus.
- Leave it there.
If you’re photographing someone spinning the wire wool, focus on where they’ll be standing.
If you’re doing it yourself, you can place an object where you’ll be standing and focus on that.
Use a Tripod
A tripod is pretty much essential.
You’re going to be using relatively long shutter speeds, so even a small amount of camera movement can ruin the photograph.
Set your tripod firmly on the ground.
If your camera has image stabilisation, check whether your camera/lens combination recommends turning it off when mounted on a tripod.
Shutter Speed
The shutter speed controls how long the camera records the movement of the sparks.
Shorter exposure
2–5 seconds
You get shorter trails and less of the circle.
Medium exposure
5–10 seconds
This is a good starting point and can capture a large portion of the spinning movement.
Longer exposure
10–20+ seconds
This can create longer, more complete light trails and allow you to capture multiple movements.
The longer you expose, however, the more ambient light you’ll record.
Aperture
I’d start around:
f/8
This gives you a good balance between keeping the scene sharp and controlling the brightness of the sparks.
If the sparks are too bright, try:
f/11 or f/16
If the photograph is too dark, try:
f/5.6
Remember that changing the aperture also affects how much of the background is visible.
ISO
Keep the ISO reasonably low if possible.
I’d start at:
ISO 100–400
A low ISO helps keep the image clean and makes the bright sparks stand out against the dark background.
If the surroundings are extremely dark, you may need to increase it.
White Balance
This is something worth experimenting with.
Wire wool produces a lovely warm orange colour.
A cooler white balance can make the overall scene look more blue while keeping the sparks orange.
Try somewhere around:
3,500–4,500K
Because you’re shooting RAW, you can also change the white balance later in Lightroom.
Positioning Your Camera
Composition makes a huge difference.
Don’t simply point the camera at the person and start spinning.
Think about what you want the final photograph to look like.
Try:
- Putting the person in the centre
- Including reflections
- Shooting beside water
- Including interesting buildings
- Using a low camera angle
- Leaving plenty of space around the spinner
- Using the environment to frame the sparks
A wide-angle lens can make the circle look much larger.
The Classic Circle
The classic wire wool photograph has the person standing in the middle while the burning whisk is spun around them.
The camera records the sparks as a circular trail.
The person often becomes relatively dark compared with the bright sparks.
This creates a really dramatic photograph.


6
Adding Water
One of my favourite ideas would be doing this beside water.
A calm lake, beach or other suitable open location can produce reflections from the sparks.
The reflection can effectively create a second circle underneath the original.
Just be extremely careful around water and make sure burning material cannot ignite anything nearby.
Camera Settings for a First Attempt
If I was doing my first attempt with a Sony APS-C camera, I’d start with:
Manual mode
ISO: 100
Aperture: f/8
Shutter: 8 seconds
White balance: 4,000K
Focus: Manual
File: RAW
Lens: 16–50mm at the wide end
Take a test shot and adjust from there.
If the sparks are too bright:
➡️ Reduce the exposure.
If the background is too dark:
➡️ Increase the ISO or lengthen the shutter speed.
If the trails aren’t long enough:
➡️ Increase the shutter speed.
Back Button Focus
If you’re using a Sony camera with back-button focusing, this is another situation where it can be useful.
I like separating focusing from the shutter button because once you’ve focused on the person, you don’t want the camera trying to refocus when you take the photograph.
Set your focus before starting and then leave it locked.
This is particularly useful when you’re working in near darkness.
Getting the Timing Right
This is probably the hardest part.
The person spinning the wire wool needs to start moving at roughly the same time as the shutter opens.
If you’re using a remote shutter:
- Get everyone into position.
- Start the camera exposure.
- Ignite the wire wool safely.
- Start spinning.
- Keep spinning until the exposure finishes.
It may take several attempts to get the timing right.
That’s completely normal.
Try Different Movements
You don’t have to make just one circle.
Once you’ve mastered the basic technique, you can experiment with different movements.
For example:
Vertical circles
Spin the whisk vertically to create a different shape.
Horizontal circles
Hold the whisk lower and create a disc of sparks.
Multiple circles
Change the direction or height during the exposure.
Walking
A person can potentially move during the exposure to create more unusual trails.
However, keep the setup simple until you’ve mastered the basic technique.
Don’t Forget the Background
A completely black background can look dramatic, but adding some environmental detail can make the photograph much more interesting.
Look for:
- Bridges
- Buildings
- Rocks
- Piers
- Beaches
- Interesting architecture
- Reflections
- Industrial locations
- Open landscapes
The sparks become the main subject while the environment gives the photograph context.
Editing Wire Wool Photos
I normally shoot RAW because it gives me much more control afterwards.
In Lightroom, I’d start with:
Highlights
Reduce highlights if the sparks are clipping.
Shadows
Increase shadows slightly if you want to reveal the person or background.
Whites
Adjust carefully to make the sparks stand out.
Blacks
Reducing blacks can give you that dramatic dark background.
Clarity
A small increase can help make the sparks stand out.
Temperature
Experiment with the colour temperature to control how warm or cool the image looks.
Make the Sparks Stand Out
One of the main things you’re trying to achieve is:
Bright orange sparks + dark surroundings.
You don’t necessarily want to brighten the entire photograph.
Instead, keep the background relatively dark and let the sparks provide the light.
This creates much more impact.
Common Problems
The entire photograph is too bright
Your exposure is probably too long or your ISO is too high.
Try reducing ISO or closing the aperture.
The sparks are blown out
Try a shorter exposure or smaller aperture.
The person is completely invisible
That’s not necessarily a problem.
A silhouette can look great.
If you want to see more detail, you’ll need some controlled ambient or additional light — but be careful not to introduce anything flammable near the spinning sparks.
The circle isn’t complete
Try increasing your shutter speed or improving the spinner’s timing.
The photograph is blurry
Make sure the camera is firmly mounted and that focus is locked.
My Recommended Starting Setup
If you’re trying wire wool photography for the first time, don’t overcomplicate it.
I’d use:
Sony APS-C camera
16–50mm lens
Tripod
Manual focus
ISO 100
f/8
8-second shutter
RAW
Then adjust the shutter speed and aperture based on your first few photographs.
The most important thing is getting the exposure, composition and timing working together.
Final Thoughts
Wire wool spinning is a great way to experiment with long exposure and light painting without needing an expensive lighting setup.
It’s also a good exercise for learning how shutter speed changes the way movement is recorded.
Once you’ve got the basic circle working, start experimenting with different locations, reflections, camera angles and compositions.
Just remember that you’re deliberately creating burning sparks, so safety needs to come before getting the photograph.
Get the location right, check the weather and surroundings, keep water available and never leave burning material unattended.
And once you’ve got the technique mastered, you can start getting really creative with it.
No responses yet